B 4 blessings.....my 4 boyssss

Saturday, August 20, 2011

Fall Banner

Is it toooooo early to start thinking of fall???  With all the 100 degree temps in SE KS the crisp autumn air will be so refreshing when it arrives....In anticipation of the coming season I created a fall banner.
I have Incorporated a ton of ribbons and fibers on my banner....toooo much is never enough...lol!
 I visited the Graphics Fairy and used some of her awesome vintage images to create charms.  If you've never done this before it is such an easy process...simply apply glossy accents to a Tim Holtz fragment...apply to image...smear around a bit and place on the part of the image you want on your charm...then just cut out...so much fun!  My letters are cut from Storybook...I've layered three of each, embossed, inked and then added some perfect pearls in green patina.
 Don't you just love the big harvest moon I found on her sight....I save the photos to my computer...inserted them into a word document...made them the size I wanted and printed out on photo paper...card stock will do in a pinch.
 I've also made charms from calenders from one of Tim Holtz's paper stacks...these are from the Lost and Found stash...I made charms from all of the months included in the fall season...and added charms that reminded me of the holiday we celebrate in each month.
 I made a little alpha charm from the same TH stash...q for quail...reminded me that school begins....I also added a charm that I made using a b/w photo of my boys....you can see it in the right corner.....
 The shipping tags and the chipboard leaves are both distressed with the same technique...I used fall colors in these distress inks for the tags...spiced marmalade, rusty hinge, and scattered straw...for the leaves I used those and wild honey, walnut stain, tea dye, forest moss and bundled sage.  Blot craft mat (i use a laminated placemat that I picked up at the $1 store) with the ink colors you want to use, being careful not to mix colors on your pads...then spritz with water and run tag or chipboard piece through them...Tim has the best techniques...after the tags dried I ran them through my cuttlebug with one of his embossing folders and then double distressed them with walnut stain, running the pad directly over the raised image and along each edge of the tag.  I added some of the green patina perfect pearls to the chip board leaves and finished them off with stickles.
 I also added a word tag by Tim and a heart trinket from FabScraps....please enjoy my video if you would like to see additional views.......thanx for stopping by today....

click on link to view video

Happy Scrappin,

Sandy

Just wanted to add some outdoor photos...last night i was in such a rush to post...these are a bit easier to see!


Wednesday, August 17, 2011

Grapic 45 The Magic of Oz Altered Book

 Hello everyone...I'm enjoying my last day of summer vacay relaxing at home with my son and working on some projects.  Today Mcauley assisted me in creating my first video for youtube.  We are a work in progress and promise to get better...but not bad for beginners...LOL!
I am so excited to share one of the projects I've been working on, this altered book with The Magic of Oz papers by Graphic 45.  I am going to be instructing an inspiration class for this book.  The store I work and instruct at is called Scraps and is located in Joplin, MO.  In light of the horrific tornado that struck Joplin this past spring we thought it would be appropriate to host a class for people to create a journal to remember their experiences and these papers were a perfect for such a book.
This is a close up of my poppies...created with my Serenade cart...the butterfly cut....using 2 butterflies...cut one in half the other in fourths....attach layers to a piece of cardstock cut into a circle...use the MS cornflower punch and some bling to create the center...add leaves from A Child's Year and some fiber.

click on the link below to see the video of this book
Altered Book/Graphic 45 The Magic of Oz


Happy Day....Sandy

Saturday, August 6, 2011

Lots of fun to share......

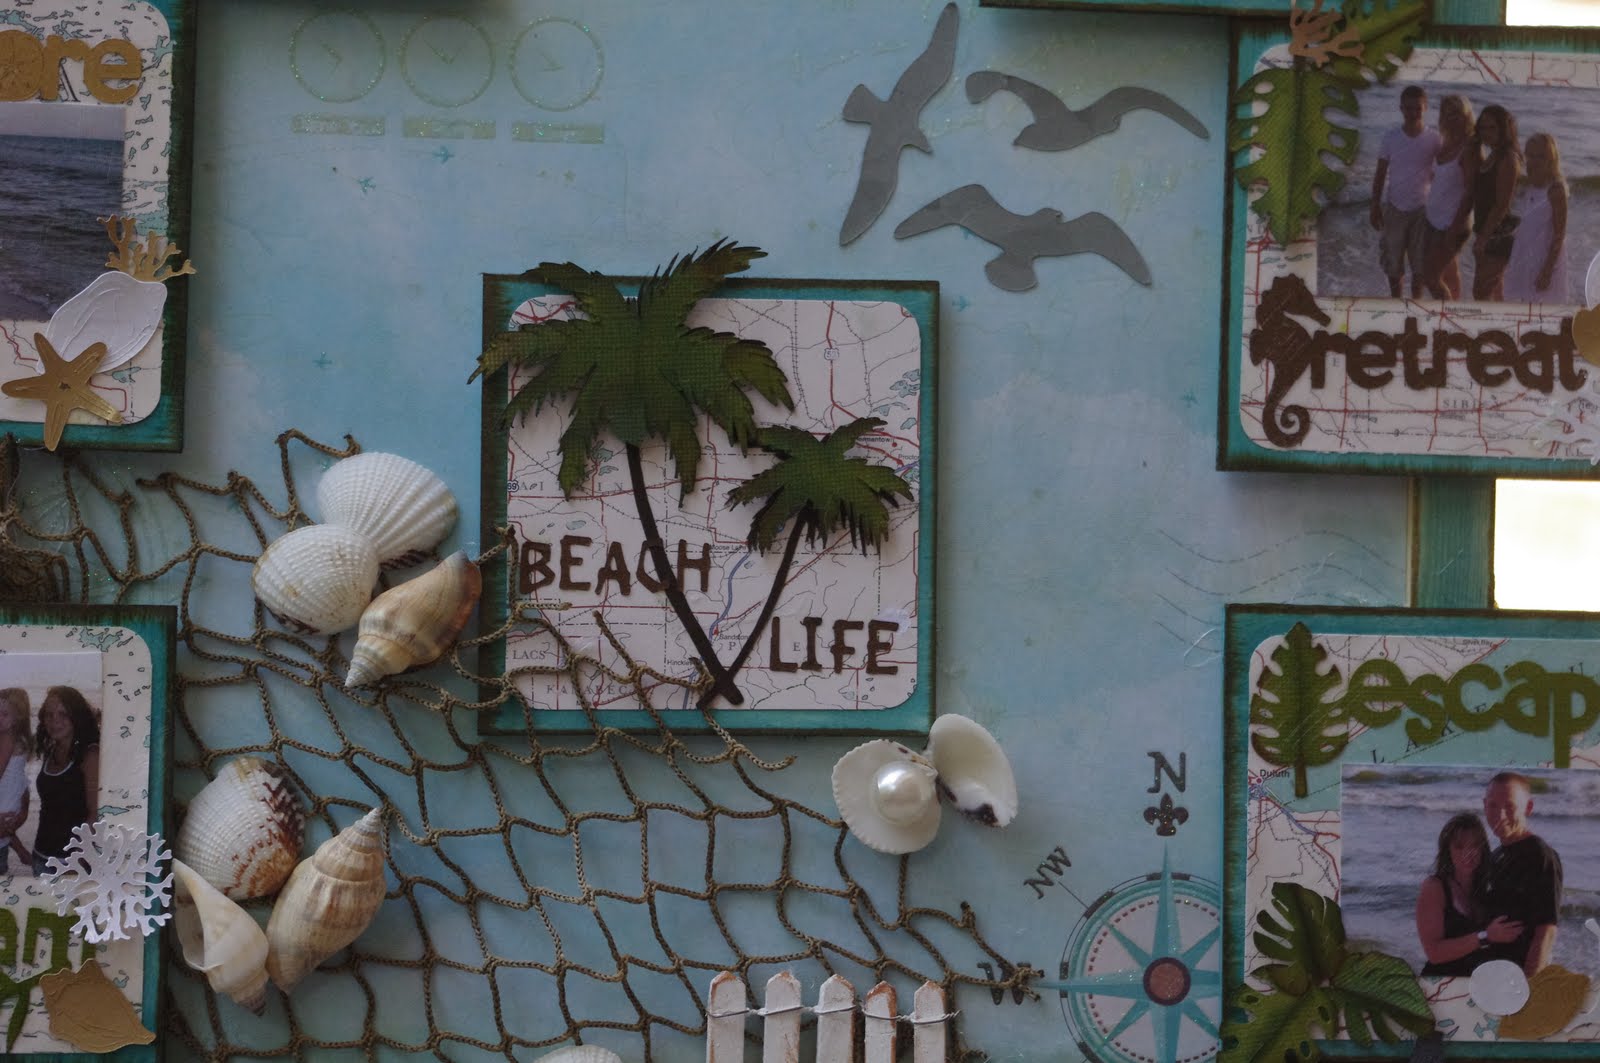
 I am so blessed to have so many people who love me in my life.  My bestie (since we were 16) and her family provided accommodations for us at Panama City Beach, Florida for a week.  There were a total of 15 of us on the trip and it was priceless.  I wanted to create something for them to remember the time we shared and here is what I came up with...hope you enjoy.....
 I chose some of my fav photos of their family and created another photo frame with a fun beach theme...the cuts are all from Life is a Beach...cut at various sizes to fit the photo blocks....
 I inked my leaves only...leaving the rest of the cuts fresh as a sea breeze.....
 added net and shells.....and a bit of picket fence
 pelicans guard each of the bottom corners of the frame....
 my girlfriend liked the title "Beach Life" on something she saw while shopping on the beach...so that is the title I chose as well....
 inexpensive stemware made fab candle holders for each of the travelers....I added name, PCB (panama city beach) and 2011 to each glass...then I chose images from my cart that reflected something personal for each of us....Palm Trees, Pelicans, Flip Flops, Bikinis, Mermaids, Crabs and Shells.....
 I filled the bottom of the glass with sand and added some shells purchased on the trip...then a little tea light in the center of each.....
 the bikini and flip flops were some of my fave cuts for the teen girls.....
 even the tiniest details were etched into the glass from the slits in the cuts...they look fantastic lit.....
 paper scraps and a 50 states cut house the DVDs i made for everyone....i took nearly 500 pix and wanted to save them all...a wonderful music DVD will help us remember our trip always....
 these are some glasses etched with cuts from Ashlyn's Alphabet....the glasses are filled with bath salts which add to the senses when burning the candles....
 believe, dream, and imaging....cut at 1 1/4, 1 1/4 and 1 inch......
faith, home and family from Home Accents @ 1 inch and then the frame from the same cart cut at 2 inches...cut from vinyl, applied to the candles...then I added some Glue n' Seal just to be sure they did not come loose.....I think they look fantastic....will be teaching a vinyl class at my LSS this month for these pretty home accents.

I hope you are all enjoying the last of summer....I know I am.....thanx so much for stopping by...thanx for the sweet comments and your continued support......happy day to all!!!

XOXO
Sandy

Sunday, July 3, 2011

Life's Moments

Happy Sunday!!!  Today I have a layout and a framed project to share...two  more class ideas for my local scrap store.
 These papers are just so beautiful...I forgot the paper line and the layout is at the store...but I will add them later.  Lots of feminine touches on this one.
 These flowers were created with the tattered florals die....the leaves are from A Child's Year...inking helps bring them to life.
 I used my Martha Stewart corner punch to create the strips...cut them at 2 inches and then corner punched the edges...at 2 inches you can push the paper all the way in to get an even punch...then I've laced them with some cord and added some rhinestones.
 My photo mats are from A Child's year and I used some of the left over layers from the die to create the 2 smaller flowers.
 My circle was again created using the corner punch...lots of YouTube vids on the corner punches...gotta luv YouTube...can't really give anyone specific credit...so many out there.  I've added ink and pen to my butterflies cut from Serenade...the metamorphosis from plain card stock to these pretty butterflies is wonderful.
This is my take on the framed piece by Tim Holtz...I've used his Salvage Stickers, grunge paper to add layers to some...the clock, calendar and compass are also from the sticker stack...filmstrip ribbon, tape ribbon, game pieces, keys & locks, tassels, word sticks and hinge clips help finish the piece.  The background is made up of 3 pieces of Bazzil that have been embossed with the wonderful texture fade embossing folders...Tim has such yummy stuff....luv it!!
Hope everyone is getting ready for a funtastic 4th!!
Luv & Hugs,
Sandy

Friday, July 1, 2011

A Boy's Journey~~~~mixed media altered frame~~~~

Happy Friday everyone!!!  I am having soooo much fun altering these frames...this one is for my youngest son, Macauley...the gears are already spinning for the next one....LOL
I've used several different media for this one....Broken China distress stain accented with Walnut distress stain cover the frames...I luv this stuff!!!! Once again taking advantage of the wonderful grunge shapes by Tim Holtz...again covered with stain and accented with a little black ink.
U TWO and the clock, calender and compass are from the fun Salvage Stickers from Tim.  I love the look of the wooden alpha beads....picked them up at WalMart.
I've add white alpha stickers for....is the destination....under the LIFE ticket.
The gears, crosses and wings are all from Indie Art.
The clock hands are from Graphically Speaking and the word LIFE from Storybook.  I bought the library cards and tickets from US Toys...really inexpensive and easy to alter.  I've crumpled and added walnut stain to both....the card reads.....Author: Heavenly Father, Title:  Your Life, Borrower:  Mcauley, Due Date: ? and the note says...Write your own story!!!! Love, God
This is what the frames look like packaged....i paid $5.97 in the WalMart craft department!

Hope you likey!!

PS.....to all my bloggy buds.....I've tried to leave comments and am unable to for some reason...one of the reasons i don't blog as much as i used to is the frustration with the system....but I sooooo appreciate all of my followers....everyone that stops by....each heartfelt comment....I hope I offer some inspiration to you....thank you all for all the inspiration and support you give me!!
Scrappy Hugs & Love,
~~~~Sandy~~~~

Tuesday, June 28, 2011

"Family"....Altered Frame

 Hi all...hope this finds you happy and well.  Summer sure is speeding by all tooooo quickly.  I'm loving every minute but they sure to fly by.
Time to start getting ready for my July classes for Scraps! when I saw this frame in the craft department of my local WM I had to grab one and see what I could come up with....and here it is.
 The frame is 12x12 and comes with nine, four inch pieces that fit inside of it.  I decided to 'think outside the box" and use them as mini 'frames' to surround the larger one.  I used BasicGrey papers...yummy designs from the Sweet Threads collection.
 My fonts, words, and photo corners are all cricut cuts...you will probably recognize....Heritage, Home Accents, Home Decor, Opposites Attract, A Child's Year and Wall Decor and More.
 I've cut my green paper at 3 1/2 inches and then used a corner rounder punch on them.  The frames are stained with Peeled Paint Distress Stain by Ranger and accented with Walnut Distress stain, also used these to color my grungeboard.  I've also added some fun grunge shapes from Tim Holtz. 
 Have you seen the Enamel Accents by Ranger????  Just luv them...I've added them to accent the grunge cuts and used them instead of brads in my hinges.
A bit of lace, a button, and some fave pix of my boysss completes the project....hope you like...can't wait to teach this class!!!!!

Hugs,
Sandy

Monday, June 20, 2011

Tim Holtz Weekend


I can't say enough good things about this weekend.  Tim Holtz is the most personal, genuine, crafty guy I've ever met.  He taught us sooooo much in such a short time....My favorite part was watching everyone create something wonderfully unique....even though we were all given the same products. 
Tim's wait list for stores in 7 years!!!!  Wowzers...I feel so fortunate to have been able to see him....I hope I have another opportunity to do this again...but if not...I'm sure grateful for this one.
Tim gave permission to teach any of these in classes....so believe me...I will be teaching and sharing....watch for upcoming information on his fantastic techniques!!! 
There is an album on my facebook if you would like to see the photos in color...thanx for stopping by...
Sandy